


Hi everyone and happy Sunday! We checked off THREE more recipes from Claire Saffitz’s Dessert Person with this week’s bake—numbers 27, 28, and 29! This latest recipe from the Pies and Tarts chapter of the book was the Apricot and Cream Brioche Tart, which also called on two more Foundational Recipes in the book: Claire’s Brioche Dough, and what she calls “the easiest recipe in the book,” the Honey Almond Syrup.
Lauren’s Take
Wow, what a week this was for us here at the Sisters&Safftiz kitchen. I was pretty nervous going into the bake this week for a few reasons…
1. We had to make 3 recipes
2. I had never worked with apricots before and did not know how to tell if they were ripe
3. I can barely spell Brioche, never mind bake it

So, safe to say we had a healthy amount of fear and excitement going into this week’s bake. It has three components like I mentioned; the brioche dough, the apricot tart topping, and the honey almond syrup.
The first component I made was the brioche dough, due to its long rising/chilling time. I had never made brioche before and because it sounds so fancy, I was pretty nervous. But once I read through the recipe and the steps, it became less intimidating. Brioche is essentially an egg-y bread with TONS of butter (so really what can go wrong?). As I was making and baking it, it reminded me a lot of the Italian Easter bread my mom makes! So maybe I’ve been eating bougie brioche my whole life and didn’t know?

While I was making the dough, I played the video on YouTube of Claire making her “Pigs in a Brioche Blanket” video in order to have a real-time example of making the dough, which I found super helpful. You start the dough by heating milk to lukewarm and then pour it over the active dry yeast to proof it. So, I ended up doing this a couple times because I thought I kept messing it up; I would find that the yeast would start to dissolve and then sort of clump together. At first I thought maybe it was because the milk was too hot, but I was careful to not heat it over 105 degrees. I did a bit of research and found that it is very common for yeast to clump when you proof it in milk versus in water. I did see some foaming and it smelt yeast-y so after the third try with similar results I just went for it (and spoiler alert, it worked out so don’t panic too much if this happens to you!)

Once the yeast is proofed, you put in into the mixing bowl with the flour, sugar, salt and 6 (!!!) room temperature eggs. I used my stand mixer, like Claire recommends, to slowly mix this massive batter together until it comes together, pulls away from the sides of the mixer easily and looks soft and shiny. This took a lot longer for me than expected and I had to keep adding small amounts of flour throughout because my dough stayed pretty sticky for a while. During this first mix, make sure to stop the mixer periodically to scrape dough off the hook and down the sides of the bowl. Once the dough looks soft, supple, and shiny, you can start adding the pieces of room temperature butter. And it’s a lot of butter friends. You have to add the pieces of butter one slice at a time, only adding the next piece once the previous has fully incorporated into the dough. It took me about 15-20 minutes to add all the butter pieces, but once you’re done, you are left with the softest, smoothest, shiniest dough I have ever seen. You then remove your dough from the mixer, form it into a ball, place it in a bowl, and cover with plastic wrap. You let the dough sit out at room temperature for about an hour until it doubles in size, and then place it in the refrigerator to chill and proof for at least 8 hours and up to 24 hours. My little brioche grew so well both out at room temperature and then again in the fridge. I was so pleased that I named it Joiche (like Josh but fancy) the brioche.

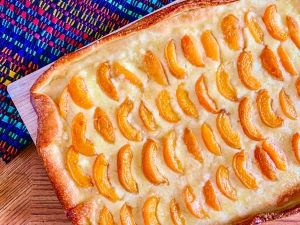
After my dough had chilled overnight, I removed it from the fridge and separated it in half since that’s all you need for this recipe. I took one half and shaped it into a roll, put it in a loaf pan and let it proof at room temperature. Then I took the other half to use for my apricot tart. You take the dough and roll/stretch it out to a 16×12 inch rectangle and place it on a parchment paper lined baking sheet. You then fold the edges over-top of the dough to make a border and press it down. This dough, once shaped, also needs to set for about half an hour. During this time, I made the crème fraiche topping and sliced my apricots which were PERFECTLY ripe (side story: I had to buy apricots twice because my first ones rotted instantly. Life lesson – don’t buy apricots from Walmart).

After half an hour, my brioche dough was ready. I topped it with the cream and then placed the apricots wedges over-top. You then brush the edges with egg wash and then sprinkle the whole thing with white sugar. Then place in the oven and wait for magic to happen!
The tart bakes for about half an hour, until the brioche is golden brown and the apricots start to soften and brown as well. While it was baking, I make the honey almond syrup/ the easiest recipe in the book (WE MADE IT). It was easy. That’s all I gotta say on that guy.

This smelt amazing while it was cooking and it was so neat to watch the dough rise in the oven (it got a lot more height than I expected!). This was a unique week because Julia and I were essentially baking at the same time and texting each other about how beautiful they looked in the oven. Once your tart has baked, you remove it from the oven and immediately brush it with the syrup, brushing more syrup on it every 10 minutes or so while it cools. I used all the syrup as Claire suggests, but found it was definitely a bit much so you could get away with using less. Once my tart was done, I put my brioche loaf in the oven and made some bread (love a 2-for-1!)

I brought this tart to a BBQ for my friends’ 10-year anniversary and was a bit nervous. There’s something a bit scary about bringing a dessert you have never made or tried before to a gathering of people, but I trust Claire and I was feeling reckless. This tart did not disappoint and people ATE it up, literally and metaphorically. I got so many compliments about this dessert, and they were well warranted in my opinion. This tart was unreal. The brioche dough was so light and buttery, the cream was delicious and the jammy apricots glazed with the honey almond syrup…oh man, there is literally nothing wrong with this dessert. It may take a while to do because of the brioche dough, but it is WELL worth it. I will never be the same. 5 stars for me.
Julia’s Take

Hi friends! I truly cannot believe we are already almost at recipe number 30 out of 105. I know both Lauren and I are so grateful for all of you that have been following along on this little project of ours. I have been enjoying this chapter of the book so, so much. The timing of working on pies and tarts through the summer when there is so much beautiful fresh fruit in season worked out perfectly (minus the slightly trippy experience of having pumpkin pie in June, but is there ever really a bad time for any kind of pie?). All of the different flavours, ingredients, and types of dough we’ve been able to work with over the last few weeks have been really, really fun!

We’ve already checked off Claire’s pie dough, sweet tart dough, graham cracker crust, and rough puff in this chapter, and this week’s bake brought us a new one: the brioche dough. I’ve only made brioche one other time, at the very start of the pandemic, and absolutely loved the process and the fluffy, buttery texture so I was excited to try Claire’s version. The idea of using it as the base of a tart was also super intriguing to me.

Overall, this is a really easy bake! The brioche has some long rest times, but other than that it came together in less than an hour. I decided to make my dough the night before so that it could rest in the fridge overnight before assembling the rest of the recipe. This dough is not for the faint of heart—there is a LOT (A LOT) of butter in this. The base ingredients are your standard AP flour, some sugar, and some salt. You then add in yeast that has been proofed in warm, whole milk and 6 eggs (yes, you read that right—there isn’t just a lot of butter but there are also a lot of eggs. There’s a reason brioche tastes so good). Once all of these ingredients are incorporated, you slowly add in (wait for it) two whole sticks of butter (yup), adding just one chunk at a time until it is fully blended in before adding the next. This gradually enriches the mixture and makes for a super soft, supple dough that’s so beautiful and so great to work with.

Your stand mixer is truly the MVP here. The dough mixes for a good 15 minutes while the butter is added in and my mixer was HOT by the time I finished. The bowl gets pretty lodged in there too over the course of all the kneading—so much so that as I write this, my dirty bowl is still stuck on the base of my mixer despite all my efforts. Sooooo we’ll have to figure out how to deal with that at some point.

The dough sits and rises for about an hour and a half until doubled in size, and then goes into the fridge for at least 8 hours and up to 24. Mine sat in the fridge for about 12 hours and really expanded overnight! From here, it’s a quick process: the dough (this recipe uses half of Claire’s brioche recipe, so I ended up making a loaf with the second half) is rolled out into a large, thin rectangle and rests under a damp towel for 20 minutes. While it rests, I mixed together sugar, an egg yolk, and crème fraiche. Exciting turn of events: I actually managed to find crème fraiche (for those who have been following along from the beginning, I’ve always had to sub in sour cream but lucked out this time!). This mixture is spread over the dough, and then topped with wedges of fresh apricots. Can we just take a moment to appreciate the apricot? They have to be one of the more underrated fruits and, when you find them in season, they’re such a great balance of tart and sweet. The border of the dough gets an egg wash, some granulated sugar is sprinkled over the whole tart, and then it bakes for 30 minutes.

The final step is to make the Honey Almond Syrup. Could not be more simple—honey, almond extract, pinch of salt, some water, and shake. Once the tart comes out of the oven, you brush the border and the apricots with the syrup every 10 minutes until it’s all used up (about a half cup’s worth). This gives the whole thing a really beautiful shine.

I was surprised at how much the dough puffed up while the tart was baking. My house smelled absolutely amazing while this was in the oven and it tasted so, so incredible—the combination of the buttery dough, the sweet cream, and the jammy apricots was like nothing I have ever had before. This is a pretty hefty tart, so I happily shared it with some friends. Nothing has been better for my soul (aside from all this baking) than being able to see people I love again, now that I’ve been lucky enough to have my second dose of the vaccine and Ontario continues to gradually reopen. The weekend kicked off with patio beers and a tart drop-off, and ended with my best friend and her family (who I haven’t seen in a year!) coming up to see me from Toronto. Such a sweet reunion, made that much sweeter by this delicious tart. It is—you guessed it—yet another 5-star bake for me!

Next week we’ll be baking a recipe that we’ve heard can be a bit finicky—the Meyer Lemon Tart. Wish us luck!!
